Showing posts with label Craft. Show all posts

1 August 2014

Gettin' Creative with Dinky-Dye

Heidi & Baby Pip, Nigel the Kookaburra and Denis the Platypus
What a thrill to receive these photos in my inbox this morning! A loyal customer of mine (Kathleen) beautifully designed and handmade this amazing quilt for her little boy's bedroom. Kathleen has designed the quilt around our Dinky-Dye Cut & Sew characters Nigel, Heidi and Denis.

Creative and clever is an understatement!

I am so happy that my Dinky-Dye range inspired these creative projects for Kathleen, forming the colour palette and theme for her son's bedroom. No classical navy and red to be seen here! I love it!

Next on the to do list is a custom made cushion featuring Jess & Baby Toby!

Click here to see a previous post about the matching floor rug that Kathleen made to compliment the Dinky-Dye framed prints. AMAZING!

Toodle-pip,

25 February 2013

Sharing Dinky-Dye Love

IMG_7731 

I was so thrilled to receive an email this morning from a customer who has based the decor of her child's bedroom entirely around my Dinky-Dye range of prints. She even made a giant crochet floor rug to match! How awesome does this look! Loving the wall colour and that floor rug is super! Next on the to do list is a patchwork quilt using the D.I.Y Cut and Sew Kits. That's one creative and inspiring customer!

 Toodle-pip, 

20 February 2013

Nigel in the Spotlight

Nigel the Kookaburra from my Messagemark DIY Cut & Sew Kits got a little mention in the latest SHOP 4 Kids Magazine. He has been laughing all day! Nigel can be purchased from my Messagemark store here...

30 December 2012

A Crafy Christmas

Our turn again this year to have Christmas celebrations at our place. The first time at our current home, so I wanted to make it extra special. Creating paper decorations has become a bit of a tradition now, and is kind of expected by my family.

So I decided to create an outdoor dining room using spare curtains that were in the cupboard, and made decorations from random 'bits and bobs'!

 
Firstly, handmade Bonbons. Brittany being very creative, designed personalised labels that doubled as place names on the table. I love her style of drawing, unique and so detailed!

The jokes were interesting, and somehow Denis and Brittany managed to come up with 9 without any help from Google! e.g. "Doctor, Doctor, I've got a strawberry stuck up my bottom. And the Doctor says, I've got a cream for that."
 
Using a circle cutter, I cut out a heap of paper circles from an old music book purchased from an Op Shop for $2. Then using red cotton, I stitched two circles together and folded them in opposite directions to create a 3D shape. Each shape was then spaced out along the cotton to create a bunting and this was hung around the side walls of our outdoor dining room. I also made a mini bunting for my stick tree.
 
The table was wrapped in brown paper, then we painted a simple red stripe down the centre using a mini roller. Denis installed some lighting, and jars, bakers twine, fresh pine, candles and wool all came together to make perfect table decorations. 
 
Dessert was also served in jars! Simple, cheap and so so easy to do!

Happy New Year!

17 November 2012

Sweaters for shivering teapots!

 
Tucked down a little side lane off Hindley Street you will find the sweetest gallery, tea house come magazine specialty store called Magazine Gallery! I'd heard so much about this place through my tea blender friend Cherie (from Scullery Made Tea), so when I saw the exhibition "Folk Art Fanfare" pop up in my new feed on Facebook, I was already there!

The exhibition was to feature the crafty skills of Adelaide's Yarn Bombers and their take on the modern tea cosy. I invited two lady friends who I knew would appreciate a display of handmade wooly sweaters for teapots to wear on cold evenings.
My Favourite "Pineapple Frenzy"
Adorable - Sold with the teapot too!
"Itsy bitsy, teeny weeny..."
"Lamington" by my friend Kate
Magazine Gallery "Folk Art Fanfare" Event
To our delight we were also treated to a selection of cocktails (Gin or Pimm's), served in more cutely dressed teapots! Teapots teapots everywhere! Unfortunately the little sweater I fell for, "Pineapple Frenzy" was already sold when we arrived. Brilliant event idea though, through and through. Bravo!
 
Magazine Gallery
Clubhouse Lane
(Just off Hindley Street) Adelaide
(08) 8212 3773 

Toodle-pip,

7 November 2012

The Paper Workshop

We are SUPER excited to announce our spring/summer craft series, THE PAPER WORKSHOP in partnership with E for Ethel.With a focus on the festive season, and to get you crafting in time for Christmas, we present two crafty paper workshops to decorate your home or give to the favourite people in your life!

Using recycled papers, we’ll make versatile holders, fabulous decorations and other useful, lovely and upcycled items.

Sunday 18th November  | 2 - 4pm
I (Kyrie) will be creating three eco-friendly items for Christmas, including a beautiful 3D star.

Saturday 1st December | 2 - 4pm
Sonja loves printing and folding. She’ll help you make beautiful cyanotypes (dramatic blue images ‘printed’ in the sun) and then fold them into a clever holder for napkins, pictures, invitations and the like.

These workshops will be held at E for Ethel and bookings are required. Book early coz tix are limited! Please phone Amanda (08) 8367 0312.

COST 
$25  {includes materials and afternoon tea} If you have any papers that you are itching to use creatively, you can bring them along too. You’ll also receive a 15% discount & free gift wrapping for any purchases over $50 made on the day!

WHERE
E for Ethel Gifts and Cafe
Shop 7, 116-120 Melbourne St
North Adelaide SA 5006

http://eforethel.com.au/events/

Toodle-pip,

3 November 2012

Cute and Cuddly

It's time for something cute and cuddly!

Building on the success of our Dinky-Dye designs, we are thrilled to introduce our unique D.I.Y. 'Cut & Sew' Kits - A simple sewing project to make your own softie that is perfectly matched to our print range. CUTE!

Our new 'Cut & Sew' Kits are designed in Adelaide using eco-friendly materials. Each adorable Aussie character is printed onto 100% super soft organic cotton sateen, and the fluffy toy fill provided is made in Australia from recycled plastic water bottles!

The craft kits will certainly be a big hit with young and old alike - awesome stocking fillers too! BUY ONLINE NOW >

15 May 2012

Vintage Inspired Linocut

My Print Featuring Georgia's Living Room
The Original Lino
Artist's Tools
My friend Georgia Cheesman is a wee bit talented in the area of lino printmaking! Her style very much focuses around reproducing interior spaces - a pretty cool subject! Previous works have included private interiors from the Croydon area, as well as a detailed series of the Wheatsheaf Hotel called 'Before the Crowd'. She is currently planning her next exhibition which will feature a collection of creative studios/work spaces.

Georgia shares my love of mid-century furniture design and decorating, so this style is often found in her compositions. I am the proud owner of a piece from her very first exhibition, Georgia's own living room, and I must say it really is the perfect match to my own retro interior. 

If you would like to have a try at creating your own Linocut artwork, Georgia runs an evening art class throughout the year at Ruth Tuck Art School in Burnside. See the website for details >

Toodle-pip,

29 March 2012

Bowerbird Bazaar March 2012

Well the dust has settled and I am nearly finished unpacking from last weekend's Bowerbird Bazaar. Denis and I had so much fun working together on his Denis Smith Photography stand. I really do enjoy sharing Denis's story and photographic technique. It is so cool to see the customer's reaction once they hear how he achieves his Ball of Light creations. So inspiring!

So, it is impossible to go to Bowerbird without collecting a few new goodies, and this time there were many new products just itching to be taken home! Denis and I treated ourselves to a couple too... hard not to really! So what did we spend our hard earned money on?

First up this simple yet gorgeous brooch from Red Revival.
Cute wee bowls by artist Georgia Gabrielle. I'm going to use these for S&P.
A cheeky present for Denis. Cufflinks by Angus & Celeste
Gretel Girl Geometric Brooch
Gretel Girl Geometric Necklace - poorly modeled by me! Photo by Gretel Girl!

 
The lovely Sass from Ask Alice Stationery gave me these cards. Smiles all round!

Another treat for Denis - A wooden iPhone cover by A Skulk of Foxes
(However Denis picked the one without colour but thought I would add this pic cos it looks prettier!)

I'm starting to save up now for July's event!

28 February 2012

Custom Made by Be Loverly

My friend Cat at Be Loverly created this gorgeous hand stitched wall art with my help. I had a design idea, one that would suit my friends new bub's room, and Cat custom made this for me. One very talented lass!

12 January 2012

Feeling Special

I'm feeling rather special. There was a little surprise in my PO Box today. A gift from Trace at Gretel Girl Draws. Included was a cute cardboard note with fabric stitched on the back, a brooch wrapped in a special pocket made from a recycled dress pattern envelope, and some cute wooden earrings. This really made me feel all warm and fuzzy inside Trace... thank you!
Last year I purchased this groovy hoop artwork which happily sits in my new laundry! I love Gretel Girl products and plan to have a portrait illustrated by the lovely Tracy very soon!

Toodle-pip,

5 January 2012

Quirky Terrarium Holiday Project

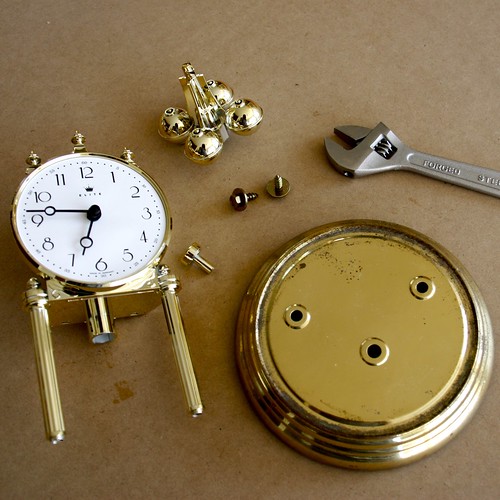
I found this clock in an op shop and instantly thought, 
"Hmmm, I could make a quirky terrarium out of you!"
Step One - Pull the clock apart so you are left with only the base and glass dome.
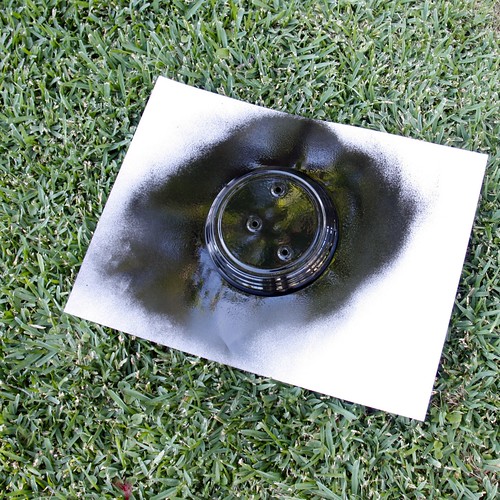
Step Two - To clean up the base, I used black spray paint. 
Depending on your decor choose any colour!
Step Three - Give the base a coat of paint in a well ventilated area and leave to dry.
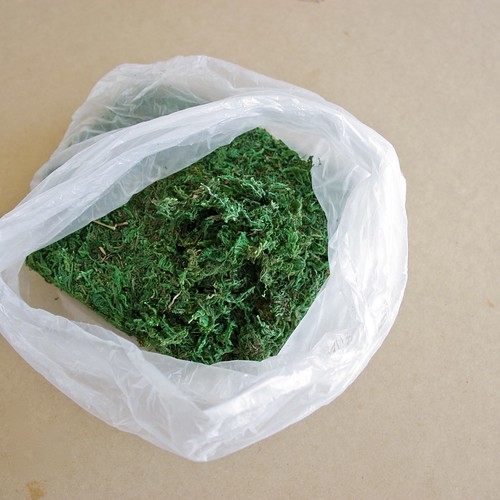
Step Four - Gather a small amount of artificial moss to cover the base.
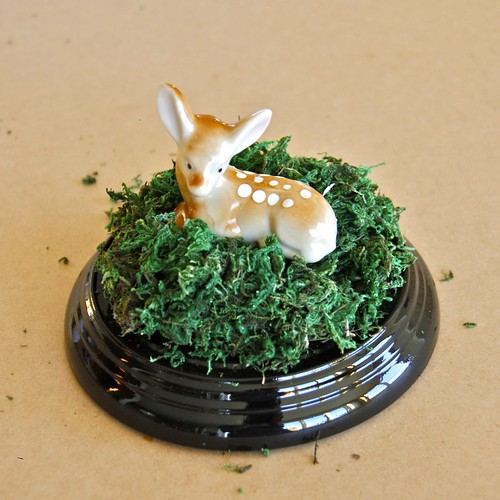
Step Five - Once the paint has dried pile the artificial moss on top of the base.
Step Six - Choose a miniature to sit on top of the moss.
Step Seven - Position the miniature in the center of the base.
Step Eight - Wash the glass dome and sit on top of the base.
And there you have it, a Quirky Terrarium! You can buy bases and the glass domes new
but they can be a bit pricey, so keep a look out for some old clocks in your local op shop.

Here's what you will need:
1. Glass dome and base - maybe from an old clock (mine cost $7.99 from an op shop)
2. Artificial moss (I bought mine from ebay for $5 + postage)
3. Spray paint any colour
4. Cute critter to live in your terrarium

Toodle-pip,


(Cute hoop artwork by Gretel Girl)
Related Posts with Thumbnails